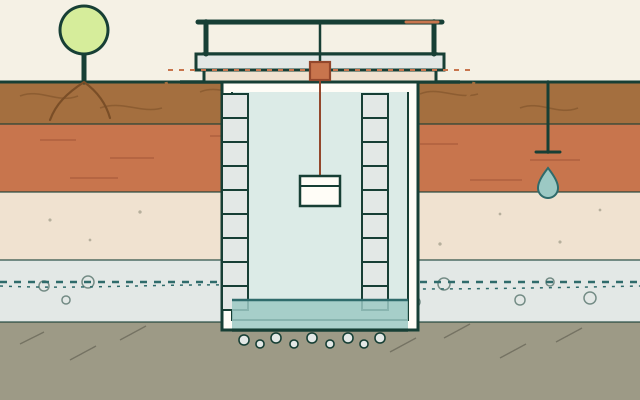
A well is the most dangerous thing in this manual. A shaft can collapse without warning, bad air can kill before anyone notices, and contaminated water can poison a household slowly. Traditional methods are not automatically safe. Learn the principles, then work with experienced well diggers, proper lifting and rescue equipment, and local water authorities.
Before you dig
Water is a right, a shared resource and a legal matter. Check who owns the land, who owns the water, and what permits, setbacks and testing are required. In many places, digging a well, abstracting water or using a pump requires approval. A well that is illegal or badly sited is a liability, not an asset.
Choose ground that is high enough to avoid flooding, away from latrines, septic systems, manure heaps, fuel stores, pesticides and industrial waste. Keep at least 30 m and stay downslope and downstream of contamination where possible; local rules may require more. Keep the well away from tree roots, buried drains and the foundations of buildings, and make access safe for carrying water.
Dig a test hole in the dry season, when the water table is lowest. A hand auger or a narrow test pit to 2–3 m will tell you more than any map: the soil layers, the depth to water, and whether the ground stands up. Never enter an unsupported test hole. Ask neighbours about existing wells, seasonal yield and water quality; a shared well may be a better solution than a new one.
Where the water is
Groundwater sits in the pores and cracks of soil and rock. The water table is the top of the saturated zone; it rises in the wet season and falls in the dry. A well must reach below the dry-season water table and still have a useful column of water. A hole that only reaches a perched layer above clay may fail in a dry month.
Look for valley floors, alluvial gravel, springs and seepage lines, and the contacts between permeable layers and clay or rock. Green vegetation in a dry season, reeds, or a line of trees can hint at shallow water, but they are not proof. Dowsing is not a reliable way to find water. Use geology, test holes and local experience.
Water quality matters as much as quantity. Shallow groundwater is vulnerable to surface contamination; deep water can carry arsenic, fluoride or salts depending on the rock. Test before drinking. A well is not a filter; it is a connection to an aquifer.
Well types
| Type | Best ground | Limits |
|---|---|---|
| Hand-dug shaft | Stable clay, mixed ground, rock; shallow aquifer | Deep, dangerous excavation; needs lining and dewatering; large volume of spoil |
| Driven sand point | Saturated sand and gravel; shallow water | Needs a steel pipe and screen; will not enter clay, gravel with cobbles or rock |
| Hand auger / bored | Clay, silt, sand; shallow depth | Small diameter; stops at gravel, boulders or rock; casing needed in sand |
| Jetted well | Sand and silt; fast shallow hole | Water supply needed; messy; unstable; not for clay or gravel |
| Spring box | A reliable spring with a defined outlet | Capture and protection only; not for a low or shifting water table |
| Qanat / infiltration gallery | Sloping water table; large community works | Huge labour and maintenance; not a first project; needs geology and agreement |
For a household well, the hand-dug shaft and the spring box are the classic low-technology options. Driven and augered wells can be quicker and safer, but they depend on metal pipe, screen and a pump. A drilled well is the safest choice in deep or unstable ground; it is not a hand-tool project.
Narrow wells: 10–20 cm, several to tens of metres
Between the wide hand-dug shaft and the deep machine-drilled borehole is a family of manual drilling methods. A cutting head is fixed to coupled steel rods; the rods are turned, lifted and dropped, or fed with water or mud. The hole is only 10–20 cm across, but in favourable alluvial ground it can reach 10–50 m — far deeper than a hand-dug shaft, with far less spoil.
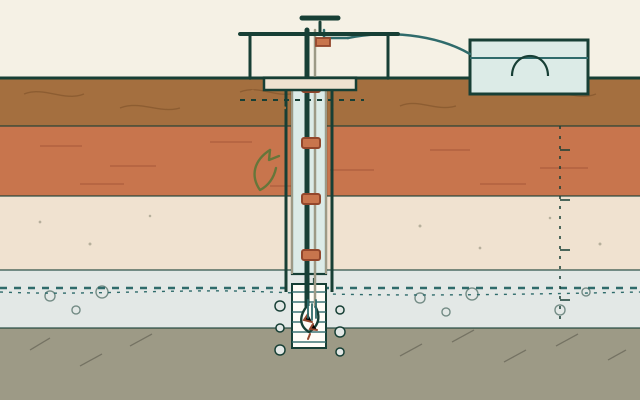
The rods are usually steel pipe with threaded or flush couplings — the “extensible screwing pipes” of traditional manual drilling. They may be solid (simple and stiff, used with augers and percussion bits) or hollow (allowing water, mud or air to circulate to the cutting head and cuttings to return). The cutting head may be an auger, a chisel, a bit, or a jetting nozzle.
Four manual methods
| Method | Cutting and rods | Best ground | Limits |
|---|---|---|---|
| Hand auger | Auger head on solid or hollow rods; turn and lift; bail or wash out cuttings | Clay, silt, sand; above and below the water table with casing | Stops at gravel, boulders or rock; 10–20 m typically; casing needed in sand |
| Percussion | Chisel or heavy bit on solid or hollow pipe; lift and drop; bail the slurry | Sand, gravel, soft rock; cobbles if small | Slow; broken bits; casing; 20–40 m with a good rig and crew |
| Rotary with mud or water | Bit on hollow rods; water or clay/bentonite mud pumped down and returned | Clay, silt, sand; stable or stabilized hole | Needs water, mud, a pump and experience; hole collapse; 20–50 m |
| Jetting / wash boring | Hollow pipe with a jet nozzle; pressured water cuts and carries cuttings | Sand and silt below the water table | Not for clay or gravel; large water demand; hole collapse; 10–30 m |
| Driven sand point | Small screened pipe driven into saturated sand; no digging head | Saturated sand and fine gravel | Only 2.5–5 cm; 5–10 m; not the 10–20 cm borehole described above |
The water-jet method is the simplest to picture: a hollow pipe with a nozzle is worked down while water is pumped through it. The jet loosens sand and silt and carries cuttings up the annulus. It works only where the ground is suitable and water is available. In clay the jet stalls; in gravel it washes out a cavern; in running sand the hole can collapse around the pipe.
Equipment for a narrow borehole
- Coupled rods — steel pipe in 1–3 m lengths, threaded or flush-coupled, with a cutting head at the bottom and a wrench or clamp at the top. Keep threads clean and do not cross-thread them.
- Cutting head — auger, chisel, bit or jet nozzle, matched to the ground and to the rod.
- Casing — 10–20 cm PVC or steel, slightly larger than the cutting head; a screened section at the water-bearing zone. Size it so the screen and pump fit: a 10–20 cm hole may take 5–15 cm casing.
- Gravel pack — washed, graded gravel around the screen; not sand or road grit.
- Lifting and turning — tripod or A-frame, winch or windlass, pipe wrench, clamps; a guide to keep the hole vertical.
- Water or mud — tank, hose, hand pump or motor pump for jetting/rotary; clay or bentonite for mud; settling pit.
- Bailer — a hollow pipe with a flap valve for removing slurry from percussion or auger holes.
How the hole is made
-
Set up and start
Mark the hole, set the tripod or rig, and start with a short auger or bit. Keep the first metre vertical; a leaning start is hard to correct. Use a guide or plumb line.
-
Add rods as you go
Couple a new rod, lower the string, and continue. Do not force a bit through gravel or rock; change the head or move the hole. Keep the rods clean and the couplings tight.
-
Remove cuttings
With an auger, lift and clear the head. With percussion, bail the slurry. With rotary or jetting, circulate water or mud and let the cuttings settle in a pit. Keep the hole full of fluid in unstable ground.
-
Case the unstable ground
Lower casing as the hole deepens, or use a temporary casing and withdraw it as the permanent screen goes in. In sand, the casing must follow the bit closely; do not leave a long unsupported hole.
-
Reach the water-bearing zone
Slow down when the cuttings change and the hole starts to produce water. Continue a metre or two into the aquifer if the ground allows. Do not drill through a confining clay layer into a deeper, contaminated aquifer without advice.
-
Install screen and gravel pack
Set the screen opposite the water-bearing sand or gravel, surround it with a graded gravel pack, and seal the annulus above with clay or cement. The screen keeps sand out; the pack keeps the screen from clogging.
-
Develop, test and protect
Surge or bail the well until the water clears. Test the yield and the water quality. Build a sealed apron, curb and cover, and fit a pump. A narrow borehole has little storage; it needs a reliable recharge and a pump that matches it.
Ground that suits narrow manual drilling
These methods work best in unconsolidated sediments: clay, silt, sand, soft gravel and weathered rock. They struggle in boulders, hard rock, running gravel and quicksand. A hand auger is happiest in clay and silt; jetting in sand and silt; percussion in sand and gravel; rotary with mud in clay and sand. If the ground will not hold a hole, or the water is deeper than about 30–50 m, a professional drilling rig is the safer choice.
Manual drilling is a real trade. Organisations such as Practica and UNICEF WASH have documented manual drilling programmes; a local team with the right rods, casing, screen and experience is worth more than a copied rig. Narrow wells are not a shortcut to a safe water supply: they need proper siting, casing, sanitary sealing and testing just like a hand-dug well.
Soil types and how they behave
The ground decides the method more than the tools do. Digging a well is not the same in clay, sand or rock; the wrong method can kill the digger or ruin the well.
| Ground | Digging behaviour | Lining and method | Water and risks |
|---|---|---|---|
| Clay | Cohesive; can stand briefly; sticky when wet, hard when dry | Line as you go; stone, brick or concrete rings; keep shaft round; backfill swelling clay | Slow recharge; low yield; may hold salts or iron; collapse when saturated |
| Silt | Soft, unstable, easily saturated | Full casing/liner; caisson rings; dewater; do not leave open | Slow water; high collapse risk; cloudy water |
| Sand | Runs and collapses immediately when wet | Caisson/ring sinking or driven casing; keep the liner ahead of the dig; gravel pack | Good yield; sand in water; quicksand; drowning risk |
| Gravel | Stands unevenly; cobbles fall; voids | Heavy lining; screen/gravel pack; no undercutting | High yield; fast inflow; unstable face |
| Mixed layers | Most common: stable layer over unstable layer | Telescoping lining; case through each unstable seam; seal the annulus near the surface | Water at layer contacts; contamination paths; uneven collapse |
| Rock | Stable but slow; fractures and bedding planes | Line fractured zones; no blasting; use chisels, wedges and hand tools | Water in fractures; low storage; drilling may be needed for depth |
| Peat / organic | Soft, compressible, unstable | Avoid; excavate to mineral ground or use a different site | Contaminated, acidic, poor water; collapse and methane |
| Expansive clay | Swells when wet, shrinks and cracks when dry | Flexible lining; backfill; keep water away from the shaft; monitor cracks | Lining movement; surface water entry; low yield |
| Quicksand / running silt | Flows into the hole faster than it can be bailed | Professional methods; casing ahead; dewatering; do not enter | Extreme collapse and drowning risk; abandon if not controlled |
The rule of the unstable layer: never excavate more than about a metre below the bottom of the lining in ground that does not stand. In sand or running silt, the lining must lead the dig, not follow it.
Digging a hand-dug well
The following is an outline for a shallow, lined well in reasonably stable ground — the kind of work that still requires an experienced well digger, a trained surface crew and a rescue plan. It is not a substitute for training.
-
Set up the headworks first
Mark a circle 1–1.5 m across. Clear a level working area and spoil zone at least 1 m back from the edge. Set a strong tripod or A-frame over the shaft, with a windlass or winch, a rated rope, a bucket with a secure attachment, and a harness and lifeline for the digger. Keep children and animals out.
-
Dig in short stages
Excavate evenly, keeping the shaft round and vertical. Fill the bucket, signal the surface, and wait until it is clear before moving under it. Never overfill the bucket or stand under a loaded rope. Keep the edge clean so tools and stones cannot fall in.
-
Line as you go
In stable clay or rock, build a ring of stone, brick or concrete as the shaft deepens, leaving no more than about a metre of unsupported ground below the last ring. In unstable ground, use the caisson method: build a ring at the surface, excavate inside it, let it sink under its own weight, then add another ring on top. Never undermine the ring to make it sink faster.
-
Control the water
Bail or pump the inflow as you approach the water table. If the inflow is too strong to keep the bottom workable, stop, finish the lining and return when the water is lower. Do not stand in deep water in a shaft. In sand, keep the lining ahead and add a gravel pack and screen at the water-bearing zone.
-
Finish the bottom
Form a sump below the lining, fill it with washed gravel, and bring the lining down to the gravel. Water should enter through the bottom and the lower seams, not through a sealed floor. Do not seal the water-bearing layer with cement.
-
Build the headworks
Bring the lining 0.5–1 m above ground as a curb. Build a sealed apron 1–2 m wide around it, sloping away from the well, with a drainage channel. Fit a tight cover, an animal-proof seal and a clean lifting system. The apron and cover are what keep surface water, animals and debris out.
-
Develop and test
Bail or pump the well until the water clears of sand and silt. Then measure the recovery: pump or bail for a period, stop, and record how quickly the water returns. A well that cannot recover overnight is not ready, and a well that pumps dry easily has a low sustainable yield.
-
Test the water
Before drinking, test for bacteria, nitrate, pH, turbidity and any local contaminants of concern (arsenic, fluoride, salinity). Protect the wellhead, and treat the water if needed. Boiling is the reliable household treatment for pathogens; filtration and chlorination have their place, but they do not fix a badly protected well.
Lining, headworks and protection
Lining keeps the shaft open and stops soil entering the water. Stone, brick, concrete rings, timber or steel casing can all work, depending on ground and budget. The lining must be stable, plumb and continuous; gaps behind it should be filled and, near the surface, sealed against surface water. Below the water line, leave openings or a gravel pack so water can enter — but keep sand and gravel out of the water.
The headworks are the most neglected part of a well and the most important for health. A raised, sealed curb; a sloping concrete or stone apron; a drainage channel; a tight cover; and a clean bucket or pump. Keep the wellhead above flood level, fence it from livestock, and never let runoff from a latrine, manure heap or yard drain toward it.
Pumps and lifting. A windlass and bucket are repairable and cheap; a hand pump is more convenient but needs spare seals and a cylinder. A shadoof or counterweighted sweep reduces effort for shallow lifts. A rope pump can be made with local skills and a little purchased pipe, but the valves and rope are wear items. Whatever you use, keep the drinking-water bucket off the ground and never share it with a dirty bucket.
Sand, brick, concrete and plastic
Well water is only as good as the materials it passes through. Sand can filter it, brick and concrete can line it, and a food-grade plastic casing can make a narrow borehole a permanent household well. Each material has a different job — and a different set of limits.
Sand: filter pack or filter bed?
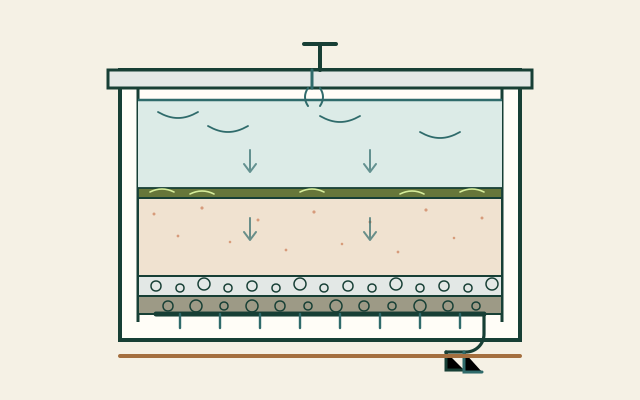
There are two different uses of sand, and confusing them is common. A filter pack around a well screen is washed, graded gravel or coarse sand that holds back formation particles. It keeps sand out of the pump; it does not make the water safe to drink. A slow sand filter is a separate treatment unit: water passes slowly through a fine sand bed and a biological layer, and many pathogens and suspended solids are removed. It still does not remove dissolved salts, nitrate, arsenic or fluoride, and it needs source protection, correct operation and testing.
Prepare sand for a drinking-water filter
-
Choose clean, inert sand
Use washed river or quartz sand, free of clay, organic matter, salt and shells; not builder’s sand with fines, and not sand from a contaminated site. For a slow sand filter, follow a proven design for grain size and bed depth rather than guessing.
-
Sift and wash
Sift out stones, roots and coarse debris. Wash the sand in clean water, stirring and decanting, until the water runs clear and the sand no longer clouds it. Wash gravel separately and grade it into layers.
-
Disinfect before first use
For a drinking-water filter, sanitise the clean sand and container before assembly — heat/steam or a chlorine soak recommended for water-treatment equipment, followed by thorough rinsing with clean water. Do not use soap. Let the filter ripen and test the treated water before relying on it.
-
Layer, not mix
Coarse gravel at the bottom, finer gravel above it, then the sand bed. An underdrain collects the filtered water; a diffuser plate protects the sand surface; a lid keeps light, insects and animals out. Keep the outlet and storage clean.
-
Run it slowly and maintain it
A slow sand filter needs a controlled, low flow and a shallow supernatant layer. Let the biological layer ripen; when the flow drops, scrape the top few centimetres of sand, wash and replace it. Test the water; if the source is microbiologically unsafe, combine filtration with boiling or another validated treatment.
Do not dump sand into a well to “filter” it. Sand in the sump will clog the screen, fill the well and create a dirty reservoir. A filter is a designed unit with layers, flow control, an underdrain and maintenance. A filter pack around a screen is a different thing, and it does not disinfect.
Brick cladding for large wells
Brick makes a strong, repairable lining for a large-diameter well. Use hard, sound, clean bricks — not painted, salvaged or salt-contaminated material — and lay them in rings with a lime or approved mortar. Build a ring beam or curb at the top, keep the well round and plumb, and leave the lower joints or weep holes open so water can enter. Backfill the annular space with graded gravel, and seal the top metre against surface water. Brick is porous: it can support a biofilm, so the well needs cleaning, a cover, a sealed apron and water testing.
Brick cladding can also be used over a concrete or stone lining as a fair face, but the structural lining must be designed for the ground and water pressure. For deep or unstable ground, brick alone is not enough; use engineered rings or a professional lining system.
Precast concrete tube sections
Where transport and manufacturing exist, precast concrete rings or tube sections are a fast, strong lining for large wells and caissons. They are lowered into the excavation, jointed, and bedded on a level footing; the annular space is packed with gravel, and the joints and top are sealed. Use sections made for potable-water service, with sound concrete and clean joints, and lift them with rated equipment. A precast ring is heavy: crushed fingers, collapsing trenches and dropped sections are real risks.
Food-grade plastic casing for narrow wells
For a narrow borehole, a food-grade uPVC or HDPE casing with a slotted screen or a food-grade mesh can turn a hole into a permanent well. Use pipe rated for potable water, not drainage pipe, recycled plastic or an unknown material; some PVC formulations contain lead stabilisers, so check the marking and buy from a reputable supplier. The screen slot or mesh size must match the sand and gravel pack, and the casing must be strong enough for the depth and the pump.
Lower the casing with a tripod or winch, not by dropping it. Fit a bottom cap, centralisers if available, and a sanitary seal at the top. Surround the screen with a graded gravel pack, develop the well until the water clears, disinfect the casing, and test the water. For critical homestead infrastructure, keep spare casing, couplings, screen, mesh and caps in store; standardise the diameter so parts fit, and protect plastic from sunlight and impact before installation.
Water quality and yield
A well is a potential pathway for contamination. Surface water can run down the outside of the casing, animals can foul the headworks, and shallow groundwater can carry nitrate from manure or septic systems. The solution is source protection first, treatment second. Test the water at the start of the wet season and after any change in taste, colour or yield.
Estimate yield by measuring the recovery rate, not by the depth of water alone. A narrow well with a good recharge can be more useful than a wide well with a thin aquifer. Store water in a covered tank or jar rather than pumping the well dry every day. If the well fails in the dry season, it is a seasonal source, not a reliable one; plan a second source or storage.
Never use a well for waste, dead animals or chemicals. Keep the cover on. If the well floods, assume contamination and test before drinking. If the water smells of sulphur or fuel, or tastes bitter or salty, stop using it and investigate.
Troubleshooting
| Problem | Likely cause | Response |
|---|---|---|
| Shaft collapses | Unstable soil; lining too far behind; undercut lining | Stop work; do not enter; stabilise with casing/rings; abandon if unsafe |
| Sand in the water | No gravel pack or screen; lining ends above the water-bearing seam | Add a graded gravel pack and screen; develop the well; do not pump hard |
| Low yield | Thin aquifer; clay layer; seasonal low; smeared bore | Test recovery; deepen if safe; develop the water-bearing zone; add storage |
| Bad taste or smell | Organic matter; sulphur; fuel; contamination | Stop use; test; find the source; seal the annulus; treat or replace |
| Water enters around the casing | Poor annulus seal; surface runoff; cracked apron | Repair the apron and seal; divert drainage; test the water |
| Lining cracks or leans | Expansive clay; settlement; water pressure; weak rings | Do not enter; assess; rebuild or abandon |
| Well floods | Low headworks; blocked drain; extreme rain | Raise the curb, clear drainage, test water before use |
| Rope or bucket fouls | Bucket stored on the ground; shared with animals | Dedicated drinking-water bucket; hang it clean; replace rope |
Limits
Hand-dug wells are suitable for shallow aquifers in ground that can be safely lined. They are not suitable for deep water tables, running sand, unconsolidated gravel with large cobbles, or sites where the water is contaminated and cannot be protected. A well that is deeper than about 10–15 m, or in ground that will not stand, is a job for a professional driller, not a group with buckets and a tripod.
A well also needs a long-term plan: a spare rope, a cover, a test, a maintenance routine and a second source. In a drought, a shallow well is the first thing to fail; in a flood, it is the first thing to be contaminated.
Safety
A well is a confined space. Never enter an unsupported shaft. Never work alone. Use a harness, lifeline and tripod; a competent surface person; a rated rope and bucket; and a gas monitor or forced ventilation. A candle is not a gas test. Low oxygen, carbon dioxide, hydrogen sulphide and methane can kill without warning. If you cannot provide these controls, do not dig by hand — hire an experienced well contractor.
Collapse and drowning. Keep spoil and tools back from the edge. Never undermine the lining. Never stand in deep water. Stop when the inflow exceeds safe bailing. Fence the shaft whenever it is unattended. Narrow drilling. Rotating rods can catch clothing and crush hands; use clamps, gloves and a controlled winch, and keep hands away from the rod string. Pressurised water can inject through skin and cause serious injury: never disconnect a hose under pressure, and wear eye protection. A narrow hole is not a place to enter. Sand and filters. Use clean, inert sand and gravel; disinfect filter media with heat/steam or chlorine according to water-treatment guidance, rinse thoroughly, and test the treated water. Chlorine is corrosive: wear gloves and eye protection, ventilate, and never mix it with acids or ammonia. Brick and concrete. Rings and bricks are heavy; use rated lifting gear, keep hands clear and never stand under a suspended load. Lifting. A full bucket is heavy; use a windlass with a brake and a secure attachment, and keep hands clear. Water quality. Protect the headworks, test the water and boil if in doubt. Law. Check water rights, permits and setbacks before digging.
Sources and further reading
- Wikipedia: Water well — well types, construction and water supply.
- Wikipedia: Well drilling — auger, percussion, rotary and driven methods.
- Wikipedia: Borehole — narrow boreholes, casing and drilling fluids.
- Wikipedia: Auger — auger types and soil boring.
- Wikipedia: Drilling fluid — mud, circulation and hole stability.
- Wikipedia: Spring — spring capture and protection.
- Wikipedia: Qanat — horizontal infiltration galleries and traditional water management.
- US EPA: Private wells — siting, testing and protection.
- CDC: Private wells — well water safety and testing.
- WHO: Guidelines for drinking-water quality — health-based water safety guidance.
- Practical Action — appropriate technology and water supply resources.
- Practica — manual drilling, well construction and water programmes.
- UNICEF WASH — water supply and sanitation guidance.
- Wikipedia: Slow sand filter — sand beds, flow and maintenance.
- Wikipedia: Biosand filter — household slow sand filtration.
- CDC: Household water treatment — treatment and safe storage.
- CAWST — household water treatment and sand filter resources.