Crop 007 / Cultivated fungi

Grow the mycelium before the mushrooms.

Cultivated mushrooms are fungi, not vegetables. Grow only known, labelled edible species from purchased spawn or kits, match each one to its substrate, and let the mycelium colonize its food before providing the conditions for fruiting.

Full inoculation-to-harvest range
30 days–18 months Fast indoor crops can approach the shorter end; outdoor logs and slower blocks need much longer.
Ready-to-fruit kits
Often 1–3 weeks Purchased kits are already colonized, so their setup-to-harvest window is much shorter.
Two distinct stages
Colonize, then fruit Mycelium must spread through the substrate before species-specific fruiting begins.
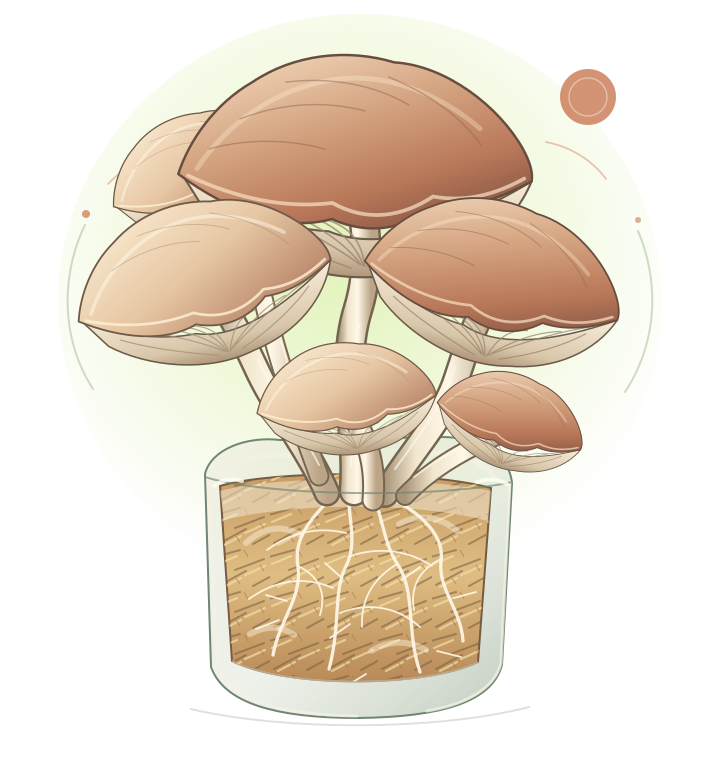
Cultivated oyster mushrooms with broad caps and clustered stems fruiting from a straw block, with branching mycelium visible in a cutaway.
The mushrooms are temporary fruiting bodies. Beneath them, mycelium grows through a compatible substrate such as the prepared straw shown here.

Know the crop

Crop profile

Several cultivated species, each with its own substrate and environment. Keep the species and strain label with every batch, and follow the supplier’s complete instructions.

Crop essentials

Species
Oyster (Pleurotus ostreatus); wine cap (Stropharia rugosoannulata); shiitake (Lentinula edodes); button (Agaricus bisporus)
Family
Multiple fungal families
Origin
Cultivation traditions in East Asia and Europe; each species has its own native range and history
Growth
30 days–18 months From inoculation to first harvest, including colonization before fruiting. Fast indoor oyster crops can approach the shorter end, while shiitake blocks take longer and outdoor logs can need 4–18 months. Purchased kits and ready-to-fruit blocks are already colonized and often fruit within 1–3 weeks, so their much shorter setup-to-harvest window is not comparable with the full timeline. Species, strain, substrate, temperature and season all affect timing.
Habit
Known edible cultivated fungi grown on species-compatible prepared substrate, not plants sown in soil

Nutrition / cooked white button

Nutrition, in context

Moderate Editorial nutrient-density rank 2. This is Rooted’s qualitative category for protein, fibre, folate, iron and potassium in the site’s cooked-food comparison, with highlights adding context. It is not an official nutritional score or a universal ranking, and it refers specifically to the cooked white-button reference below.

Reference nutrients per 100 g white button mushrooms (Agaricus bisporus), cooked, boiled, drained, without salt
Nutrient Amount
Protein 2.17 g
Fibre 2.2 g
Folate 18 µg
Iron 1.74 mg
Potassium 356 mg
  • The same cooked reference provides the B vitamins riboflavin (0.300 mg), niacin (4.46 mg) and pantothenic acid (2.16 mg) per 100 g.
  • It also provides copper (0.504 mg) and selenium (11.9 µg) per 100 g.
  • Count vitamin D from UV-exposed mushrooms only when the product is labelled or a verified nutrient analysis confirms the amount; do not assume all mushrooms are vitamin-D-rich.
  • With 2.17 g protein per 100 g, this reference is not protein-dense; beans, lentils, tofu, eggs, fish or other protein-containing foods can make a meal more substantial.

Basis: Approximate values per 100 g white button mushrooms (Agaricus bisporus), cooked, boiled, drained, without salt (USDA FoodData Central SR Legacy 169252). These figures describe one cooked white-button reference, not oyster, wine cap, shiitake or every cultivated mushroom. Species, strain, growing conditions, cooking method, water loss and serving size change nutrient values. Raw mushrooms and differently cooked products are not interchangeable with this reference, and nutrient content does not show absorption or individual dietary needs.

At the table

Build a varied meal around mushrooms

  • Beans or lentils. Mushrooms contribute flavour and texture but only modest protein. Beans or lentils add more protein, fibre and folate, making the overall meal more substantial without treating mushrooms as a protein-equivalent substitute. Cook oyster mushrooms into a bean and vegetable stew, or serve shiitake with lentils.
  • Rice, barley or whole-grain bread. Grains make a mushroom dish more filling and provide their own mix of nutrients. Add beans, lentils, tofu, eggs, fish or another protein-containing food when more protein is wanted. Serve mushrooms and white beans over barley, or fill whole-grain bread with mushrooms, tofu and greens.
  • Leafy greens, peppers or other vegetables. Other vegetables broaden the flavours, textures and nutrients in the meal. This is a flexible pairing rather than a required nutrient-combining rule. Sauté cultivated mushrooms with kale and peppers, then serve with beans and rice.

The essentials

From labelled spawn to a clean harvest

Six practical stages. Species, strain, substrate and space determine the method; supplier instructions and reliable cultivation guidance come first.

  1. Choose the species and space together

    Start with one known edible cultivated species and a small batch. Match oyster, shiitake, wine cap or button mushrooms to a compatible method and substrate before buying anything. Choose a cleanable indoor area with safe access and ventilation, or a suitable shaded outdoor bed or log yard; keep heavier production away from living and sleeping areas.

  2. Buy labelled spawn or a ready-to-fruit kit

    Purchase spawn labelled with the edible species and strain, intended substrate and storage directions. A ready-to-fruit kit is the simplest start because inoculation and colonization are already complete. Retain the label and batch details, and never substitute unidentified fungi or an unlabelled culture for the known crop.

  3. Prepare the right substrate hygienically

    Use a trusted species-specific protocol: prepared straw or an approved hardwood mix for suitable oysters, supplemented hardwood sawdust or sound logs for shiitake, untreated hardwood chips for wine cap, and properly composted substrate with casing for buttons. Clean hands, tools, containers and work surfaces. Never use mouldy ingredients, unknown sawdust or treated, painted or contaminated wood.

  4. Inoculate, then allow full colonization

    Combine cooled substrate and spawn at the supplier’s rate, or insert the specified spawn into compatible fresh hardwood logs. Label the date and hold the batch at its recommended incubation temperature with the required cover, filter or gas exchange. Let mycelium spread fully through the food source; this takes weeks in some containers and months in logs. Do not initiate fruiting after only a little visible growth.

  5. Fruit by the species-specific method

    Only after full colonization, follow the crop’s fruiting protocol. That may involve prepared openings, casing, a temperature change, rehydration or suitable seasonal weather. Provide the specified fresh air, humidity and indirect light without standing water or persistent condensation; darkness is not a universal requirement. Keep conditions steady and inspect the crop without repeatedly opening colonizing containers.

  6. Harvest, store and clean up promptly

    Pick only the labelled edible crop at the recommended stage, before heavy spore release, using clean hands and equipment. Refrigerate sound mushrooms promptly in a clean container that avoids trapped wetness, and cook them before eating. Isolate and discard contaminated batches without eating around mould; remove spent substrate, then clean and dry reusable equipment and the growing space.

Five ways to cultivate

Match the growing space to the crop

Compare a cellar, dedicated shed, small containers, an outdoor wood-chip bed and hardwood logs. Timelines begin at inoculation unless a purchased kit is already colonized.

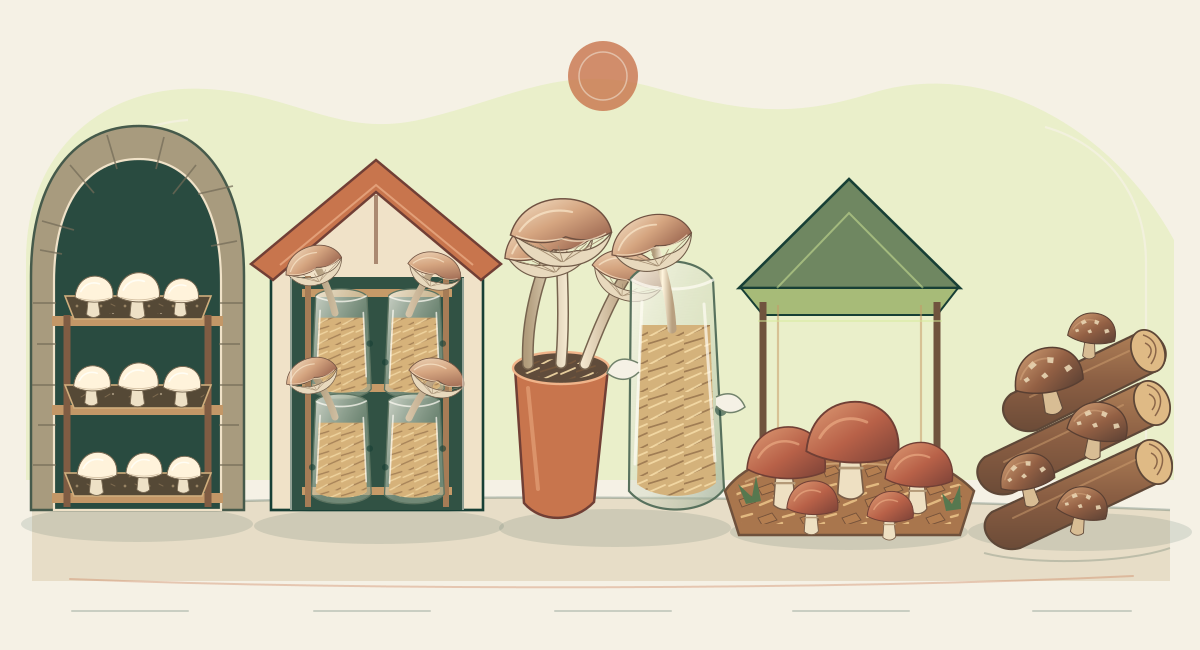
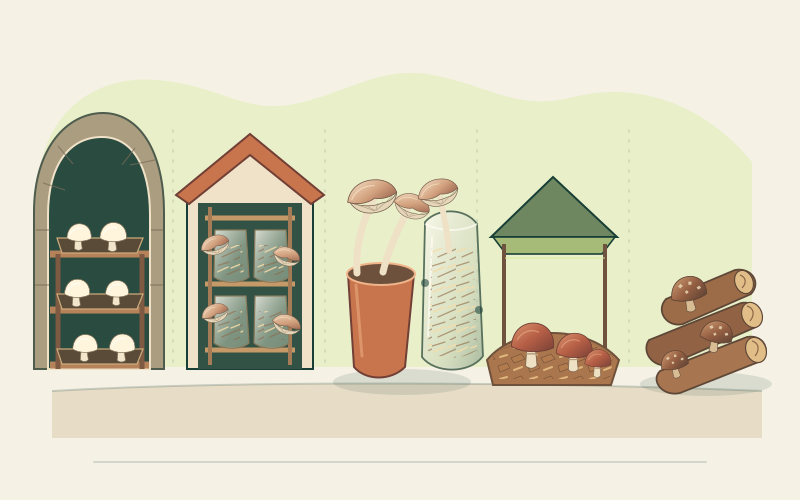
Five cultivation settings: button trays on cellar shelves, oyster bags in a shed, oyster buckets and bags, a shaded wine-cap wood-chip bed, and shiitake on stacked hardwood logs.
Five distinct systems, not interchangeable substrates. Match the labelled species and strain to the supplier’s approved material and environment.

Oyster on prepared straw or sawdust blocks and shiitake on supplemented hardwood-sawdust blocks where their fruiting temperatures suit the cellar. Button mushrooms require properly prepared composted substrate and casing, not plain straw or wood chips.

Cool cellar fruiting

Use a cleanable, ventilated cellar to fruit suitable purchased blocks or trays under stable cool, humid conditions. Colonization has different needs and may require a separate warmer space before fruiting.

Indicative timing
About 3–12 weeks from inoculation for many suitable block or tray systems, including colonization; fully colonized blocks commonly fruit within 1–3 weeks after initiation. Purchased kits are already colonized and often produce in about 7–21 days.
Conditions
Stable species-appropriate cool temperatures, high humidity without standing water, regular fresh air and cleanable surfaces. Provide safe access and follow the supplier’s light instructions; darkness is not a universal mushroom requirement.
  1. Confirm the species, substrate and separate incubation and fruiting requirements with the supplier.
  2. Set up cleanable shelving, safe access and ventilation away from living or sleeping areas.
  3. Inoculate only species-appropriate prepared substrate using hygienic supplier instructions.
  4. Incubate at the recommended temperature until the substrate is fully colonized.
  5. Move colonized blocks or trays into fruiting conditions and follow species-specific light and temperature cues.
  6. Supply fresh air while maintaining humidity without persistent condensation or pooled water.
  7. Inspect daily, isolate contaminated blocks and harvest before heavy spore release.
  8. Remove spent substrate and clean and dry the cellar between crops.

Do not use a stagnant, unsafe or persistently mouldy cellar. Manage spores and mould with ventilation, prompt harvesting, careful removal and suitable protective equipment during clean-up; never eat mushrooms from contaminated substrate.
Safety note: Keep production away from ordinary living and sleeping areas. Provide genuine ventilation, harvest before heavy spore release, avoid breathing mould during removal, and keep electrical connections and heaters safe in humid spaces. Check cellars for structural damp and radon before regular use; never eat from a contaminated culture.

A cultivation rhythm · stage by stage

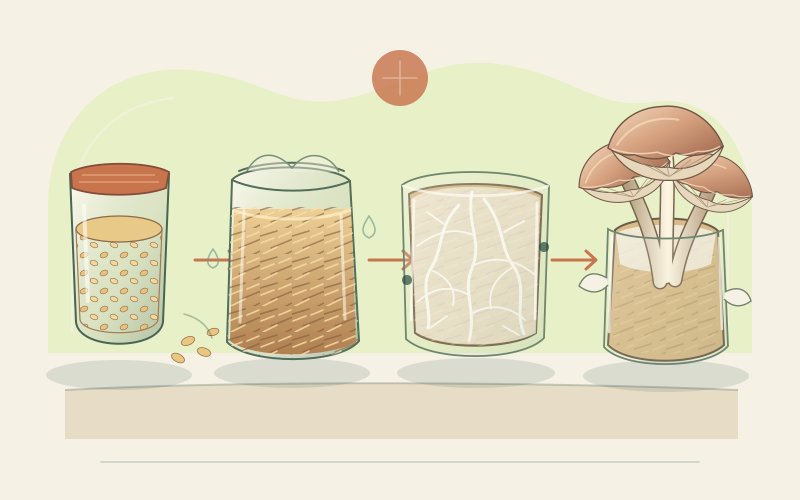
Colonization first, fruiting second

Follow the crop stage rather than fixed months. Temperature, species, strain, substrate, batch size and seasonal weather shift every interval.

  1. Prepare and inoculate

    Clean the space and equipment, prepare only a compatible substrate, cool it as directed and add labelled spawn hygienically. Record the species, substrate and date.

  2. Colonize fully

    Hold the batch in its incubation conditions while mycelium spreads through the food source. Maintain suitable moisture and gas exchange, and allow weeks or months as the method requires.

  3. Initiate and maintain fruiting

    After full colonization, introduce only the cues specified for that species. Balance fresh air, humidity and indirect light without persistent condensation or pooled water; watch for pins and developing mushrooms.

  4. Harvest, rest and reset

    Pick promptly, refrigerate the sound crop and follow species-specific resting or rehydration guidance for later flushes. Discard contamination, remove spent material and clean and dry the space.

The full 30 days–18 months range starts at inoculation. A purchased ready-to-fruit kit enters this rhythm after colonization and often fruits within 1–3 weeks; outdoor beds and logs still depend on suitable seasons.

From the field journal

Grow, house and cook cultivated mushrooms

Practical reading for matching species and substrates, planning a safe growing space and building balanced meals without overstating protein.

Your first flush begins here

Start with one labelled kit.

A small ready-to-fruit kit lets you observe humidity, fresh air and harvest timing before preparing substrate yourself. Keep the label, follow the species instructions and make notes for the next crop.

Open the growing guide