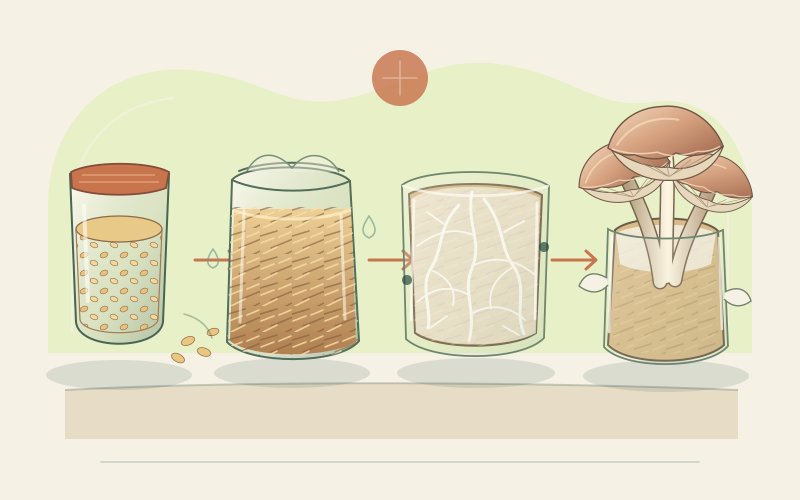
Cultivation is a process, not a packet of seeds
Cultivated mushrooms are fungi, not plants or vegetables in the botanical sense. The mushroom is a temporary fruiting body; the main organism is a network of mycelium growing through its food, called the substrate. This guide concerns only known edible cultivated species, especially oyster (Pleurotus species), shiitake (Lentinula edodes), wine cap (Stropharia rugosoannulata), and button mushrooms (Agaricus bisporus). Keep the supplier’s species and strain label with every batch.
Rooted’s 30 days–18 months growth label covers very different routes to a first harvest. A prepared oyster kit may fruit in roughly a month, while outdoor logs can need many months of colonization before their first flush. Temperature, strain, substrate, batch size, and hygiene all change that timing. The range is not a promise that every method produces continuously, or that an outdoor bed fruits in winter.
Begin with one small, labelled batch and a supplier’s complete instructions. A mushroom kit containing an already colonized block is the simplest introduction because the difficult substrate preparation and inoculation have happened under controlled conditions. You still need to provide the fruiting conditions specified for that species.
Match species, substrate, and space before buying
Fungi digest particular materials; mushroom mycelium cannot simply be sprinkled onto soil like seed. Clean, uncontaminated ingredients matter too. Do not use treated timber, mouldy straw, unknown sawdust, or material contaminated with fuel, pesticides, or heavy metals.
| Species | Suitable starting substrate | Practical setting |
|---|---|---|
| Oyster | Prepared straw or a hardwood-based mix suited to the labelled strain | Perforated buckets or filter-patch bags; some strains also suit suitable hardwood logs |
| Shiitake | Hardwood sawdust blocks or fresh, sound hardwood logs | Purpose-made bags indoors, or shaded outdoor log stacks |
| Wine cap | Hardwood chips, sometimes mixed with straw | A shaded outdoor bed, large pot, or tray with room for seasonal fruiting |
| Button, cremini, portobello | Specifically composted and pasteurized substrate, followed by a casing layer | Trays or beds with careful compost, casing, and climate management |
These are starting matches, not interchangeable recipes. Button mushrooms do not belong on hardwood logs, and an oyster kit should not be managed like a compost-and-casing button crop. Shiitake blocks commonly need more exacting preparation than oysters on straw. Choose the method only after checking what the spawn supplier and a reliable extension guide recommend for the strain.
Choose purchased spawn; treat spores differently
Spawn is living mycelium already established on a carrier such as grain, sawdust, or wooden plugs. Mix grain or sawdust spawn evenly through the prepared substrate at the supplier’s rate; insert plug spawn into drilled log holes as its instructions direct. Buy a labelled edible strain intended for the chosen substrate and season. Store and use it as directed—old, overheated, or doubtful spawn is not a bargain.
Spores are microscopic reproductive cells, not ready-made spawn. Starting from spores requires culture work, controlled sterile technique, and a way to confirm a useful, uncontaminated culture. A spore print or syringe is therefore not a beginner’s substitute for commercial spawn and should not be injected casually into a bag of substrate. Kits avoid this step; small growers can learn the crop cycle before attempting laboratory culture.
Use hygiene with the right substrate treatment
Wash hands, clean work surfaces and tools, and keep pets and general household dust away from inoculation. Work with cooled substrate and clean containers, then protect the openings appropriate to the method. Hygiene reduces the number of competing organisms introduced, but wiping everything with disinfectant does not rescue unsuitable, old, or badly prepared material.
Pasteurization reduces competing organisms while leaving some microbial community intact. It is used for materials such as prepared straw and for the carefully composted button substrate. Sterilization aims to remove viable organisms and is generally reserved for more demanding media, including supplemented hardwood-sawdust blocks. Nutrient-rich supplemented blocks are especially vulnerable if competitors survive.
Do not treat boiling water, an oven, or a domestic pressure cooker as a universal answer. Container size, heat penetration, material, and the species all matter, and improvised heating can scorch substrate or damage equipment. Follow a validated species-specific protocol and the equipment manufacturer’s safety instructions. For a first crop, a ready-to-fruit kit or professionally prepared block avoids this riskiest stage.
Separate colonization from fruiting
-
Inoculate and colonize
Combine cooled substrate and spawn using the chosen method, close the container as its filter or cover requires, and label the date. Hold it within the supplier’s colonization temperature range. Mycelium should spread through the substrate before fruiting is initiated; this may take weeks in a bucket or many months in a log. Do not keep opening the batch to check it, and do not confuse a little white growth with full colonization.
-
Initiate fruiting by the species-specific method
Once fully colonized, follow the kit or cultivation protocol. That may mean exposing oyster substrate at prepared openings, changing the handling of a shiitake block, applying casing to a button crop, or waiting for suitable weather in a wine-cap bed. A temperature change, water, casing, or increased fresh air may be relevant, but no single trigger suits every species.
-
Maintain the fruiting environment
Watch for pins, the tiny developing mushrooms, and keep conditions steady. Inspect without standing water on caps or flooding the substrate. Harvest a flush when ready, then follow the supplier’s resting, rehydration, or further-fruiting directions rather than assuming every block repeats indefinitely.
Balance fresh air, humidity, and light
Fruiting generally needs more fresh-air exchange than colonization because developing mushrooms respond to carbon dioxide and oxygen conditions. Still, a fan blasting a block dries it out. Use gentle, indirect air movement and enough ventilation for the crop and room; elongated stems, poor caps, or stalled growth require diagnosis of the whole environment, not an automatic increase in watering.
High humidity around the crop limits drying, but a sealed wet box can encourage condensation and bacterial or mould problems. Humidify the surrounding air or use the kit’s recommended chamber, allow excess water to drain, and avoid soaking developing caps. Use clean water and clean equipment.
Mushrooms do not photosynthesize, but universal darkness is a myth. Many cultivated crops benefit from low, indirect light for normal form and orientation. Ambient room light or the supplier’s light cycle is usually the right starting point. Avoid direct sun and hot grow lights, which dry and overheat the crop.
Harvest promptly and discard failures completely
Pick only mushrooms from the labelled edible culture, before they become overmature or heavily spore-laden. Harvest oyster clusters as their caps approach maturity, and pick shiitake or buttons at the stage recommended for quality. Use clean hands and a clean knife where cutting is appropriate. Avoid leaving decaying stubs or mushrooms on the substrate.
Cool sound mushrooms promptly and refrigerate them in a clean container that does not trap wet condensation. Do not eat slimy, foul-smelling, or mouldy harvests. Cook cultivated mushrooms before eating, and chill cooked dishes promptly. See our nutrition and kitchen guide for storage and meal ideas.
A culture with spreading coloured mould, persistent wet rot, or an abnormal foul odour is a failed batch, not something to rescue by cutting off the visible patch. Do not eat from it or mix it through a new batch. Close or bag it before carrying it through clean areas, dispose of it according to local waste guidance, and clean the space and reusable equipment. Keep failed cultures away from active batches; only sound, spent substrate from a successful crop should be considered for ordinary composting.